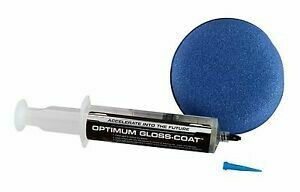
Optimum Gloss Ceramic Coating 10cc.
- Semi-permanent paint protection that looks amazing!
- Unique resin based formula that provides a second clear coat to your vehicle
- Use it on your clear coat, painted surfaces, smooth plastic trim, bumpers, head lights, tail lights, wheels, chrome, aluminum and more
- Scratch resistant and releases contaminants with ease
- Hybrid SiC & SiO2 coating meaning best of both worlds!
- 2-3 year durability
- No toppers necessary to maintain hydrophobics
Optimum Gloss-Coat™ is the most advanced polymer system that forms a layer of clear coat over automotive finishes. Optimum Gloss-Coat™ provides better scratch and mar resistance, better UV resistance, better chemical etch resistance, and has better release properties than any other consumer product while providing unsurpassed gloss and slickness. Additionally, you can top Optimum Gloss-Coat™ with any non-abrasive wax or sealant of your choice to add additional gloss and slickness.
Optimum Gloss-Coat™ can be used to protect the following surfaces:
• painted surfaces
• wheels
• plastic trim
• bumpers
• aluminum & chrome surfaces
Since Optimum Gloss-Coat™ bonds to surfaces it is applied to, any paint imperfections must be removed with Optimum Polish II or Optimum Hyper Polish before application. Also, all waxes and oils must be removed from the surfaces for proper bonding.
Directions:
1. Polish paint with Optimum Hyper Polish to remove any defects.
2. Clean surface with Optimum Paint Prep to remove all polishing oils, waxes, and silicones.
3. Prime the applicator by making an X pattern across the pad. Only a few drops will be needed for each subsequent panel.
4. Wipe Optimum Gloss-Coat™ onto a single panel at a time in a thin layer using two directions, in a circular or front to back direction.
5. Within 5 minutes, inspect the panel with adequate lighting looking for any thick areas that have not flashed away to clear.
6. Use foam applicator or paint safe microfiber to even out any areas where you see streaks. This step is key, as any spots not leveled will have to be polished if allowed to cure. Panels will feel a bit tacky and will be self-leveling during cure time, so avoid any unnecessary touching, wiping, or contact to produce the best results.
7. Repeat steps 1-6 for each panel where an application is desired.
Not recommended for glass.


